Prep Time: 25 minutes | Bake Time: 12-14 minutes per batch | Total Time: ~1 hour (with cooling)
Skill Level: Beginner/Easy | Yield: About 36 cookies | Cost: $
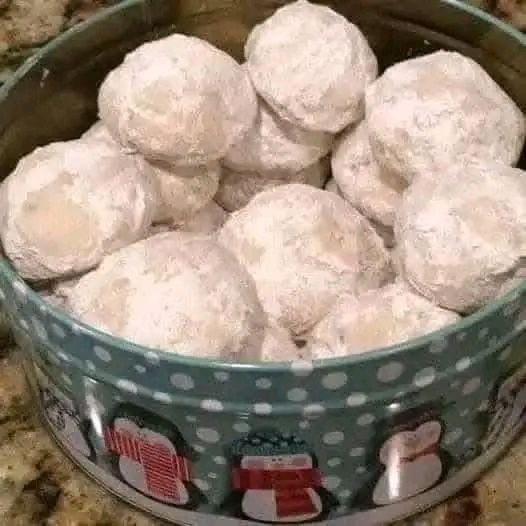
Snowball Cookies, also known as Russian Tea Cakes or Mexican Wedding Cookies, are the quintessential bite-sized treat of the holiday season. These delicate, buttery cookies are studded with finely chopped nuts, baked until just set, and then rolled while still warm in a blizzard of powdered sugar. The result is a cookie that truly lives up to its name: a sweet, snowy-white confection with a tender, melt-in-your-mouth texture that dissolves on the tongue. Their simple elegance and irresistible flavor make them a beloved favorite on cookie platters worldwide.
Ingredients
For the Cookies:
-
1 cup (2 sticks or 226g) unsalted butter, softened to room temperature
-
½ cup (60g) powdered sugar, plus much more for rolling
-
1 teaspoon pure vanilla extract
-
¼ teaspoon salt (omit if using salted butter)
-
2 ¼ cups (281g) all-purpose flour, spooned and leveled
-
¾ cup (85g) very finely chopped nuts (see “Chef’s Tips” for options)
Equipment
-
Electric hand mixer or stand mixer
-
Mixing bowls
-
Measuring cups and spoons
-
Baking sheets
-
Parchment paper or silicone baking mats
-
Wire cooling rack
Instructions
1. Prep & Preheat
Preheat your oven to 350°F (177°C). Line two baking sheets with parchment paper or silicone mats. This prevents sticking and makes cleanup a breeze. Have your nuts finely chopped to the size of small breadcrumbs—a food processor works wonders for this.
2. Cream Butter & Sugar
In a large mixing bowl using an electric mixer, beat the softened butter on medium speed until smooth and creamy, about 1 minute. Add the ½ cup of powdered sugar and beat on medium-high speed until the mixture is very light, fluffy, and pale in color, about 2-3 minutes. Scrape down the sides of the bowl as needed.
3. Incorporate Flavor & Dry Ingredients
Beat in the vanilla extract and salt (if using) until just combined. Turn the mixer to low. Gradually add the flour, about ¾ cup at a time, mixing until just incorporated after each addition. Finally, mix in the finely chopped nuts on low speed until the dough comes together. It will be slightly crumbly but should hold together when pinched.
4. Shape the Dough
Using your hands, roll portions of dough into 1-inch balls. Aim for uniformity in size to ensure even baking. Place the dough balls about 1 inch apart on the prepared baking sheets; they will spread only slightly.
5. First Bake
Bake, one sheet at a time, on the center oven rack for 12-14 minutes. The cookies are done when the bottoms are just lightly golden. The tops should remain pale and may have slight cracks—this is perfect. Do not overbake, as they will continue to firm up as they cool.
6. The First Sugar Coat (The Critical Step)
Let the cookies cool on the baking sheet for exactly 5 minutes. They must still be quite warm, but cool enough to handle. Meanwhile, place about 1 cup of powdered sugar in a shallow bowl. Gently roll each warm cookie in the powdered sugar until fully coated. Transfer to a wire cooling rack. This initial coating will create a slightly sticky, melting layer.
7. The Second Sugar Coat (For the Perfect Snowy Look)
Allow the cookies to cool completely on the rack, about 30-45 minutes. Once completely cool, give them a second roll in powdered sugar. This final coat will adhere to the slightly tacky first layer, creating that iconic, thick, snowy-white finish. Gently shake off any excess.
Chef’s Secrets & Variations
-
Nut Choices: Traditional choices are pecans or walnuts. For a more delicate flavor, use blanched almonds or hazelnuts. Toasting the nuts lightly before chopping deepens their flavor immensely.
-
Gluten-Free: A 1:1 gluten-free all-purpose flour blend works beautifully in this recipe.
-
Flavor Twists: Add ½ teaspoon of almond extract along with the vanilla for an aromatic twist. A pinch of cinnamon or cardamom in the dough adds a warm, festive note.
-
Butter is Key: Using high-quality, real butter at the perfect softened temperature (cool to the touch but leaves an indent when pressed) is non-negotiable for the right texture.
-
Make-Ahead: The dough can be made, shaped into balls, and frozen on a baking sheet. Once solid, transfer to a freezer bag and freeze for up to 3 months. Bake directly from frozen, adding 1-2 minutes to the bake time.
Serving & Storage
Serving: These cookies are elegance itself. Pile them high on a vintage cake stand, pack them in decorative tins as gifts, or arrange them on a holiday cookie tray alongside richer, darker treats.
Storage: Store completely cooled cookies in a single layer in an airtight container at room temperature for up to 1 week. If stacking, place parchment paper between layers. The powdered sugar coating will slowly be absorbed—for the freshest “snowy” look, you can give them a light third dusting of powdered sugar just before serving.
The Last Bite: A Note on Tradition
The magic of a Snowball Cookie isn’t just in its taste, but in its history and universal appeal. Found in various forms across cultures—from Eastern Europe to the American Southwest—it is a recipe that connects generations. Its simplicity is its strength, requiring no fancy piping or tempering, just a gentle hand and good ingredients. It teaches the baker that perfection often lies in subtlety: a delicate crumb, a balance of sweet and nutty, and the transformative power of a simple snowy coat. In a world of complex desserts, the Snowball Cookie remains a humble, timeless masterpiece.
Nutrition Information
Serving Size: 1 cookie | Calories: ~120 | Total Fat: 8g | Saturated Fat: 4g | Trans Fat: 0g | Cholesterol: 15mg | Sodium: 15mg | Total Carbohydrates: 11g | Dietary Fiber: 0g | Total Sugars: 5g | Protein: 1g