Prep time: 45 minutes
Cook time: 55 minutes
Chilling time: 6 hours (or overnight)
Total time: 7 hours 40 minutes
Intensity: Moderate
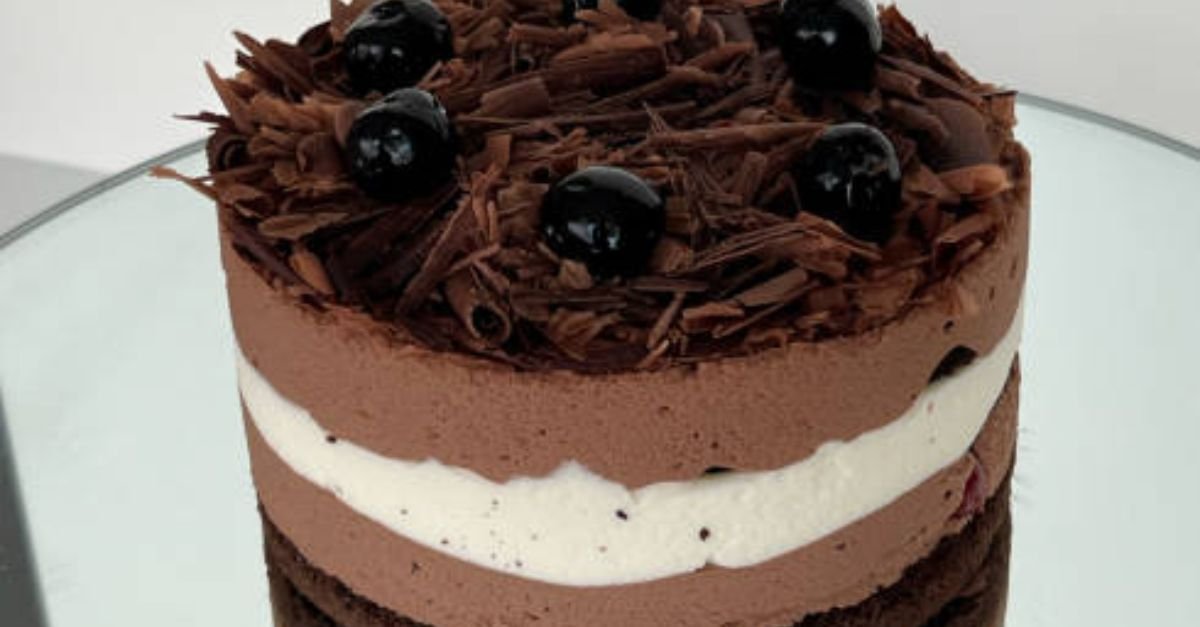
This is not just a cheesecake; it’s a showstopper. Imagine a rich, creamy, and tangy cheesecake filling, a deep, dark chocolate crust, and a luscious, boozy cherry topping. This Keto Black Forest Cheesecake brings together the classic German flavor combination of chocolate, cherry, and cream in a dessert that is entirely low-carb, gluten-free, and guaranteed to impress. Whether you’re strictly keto or just looking for a spectacular sugar-free dessert, this recipe delivers on every level of indulgence.
Why You’ll Love This Recipe
-
Rich & Decadent: Every bite is a perfect balance of creamy cheesecake, fudgy crust, and tart cherry topping.
-
Dietary Friendly: It’s low-carb, gluten-free, and sugar-free, fitting perfectly into a keto or low-carb lifestyle.
-
Make-Ahead Marvel: This is the perfect dessert to prepare for a dinner party or holiday, as it needs plenty of time to set in the refrigerator.
-
Boozy Option: The cherry topping is enhanced with a splash of Kirsch (cherry brandwine) for an authentic Black Forest flavor, but you can easily omit it for a non-alcoholic version.
Equipment Needed
-
9-inch springform pan
-
Electric hand mixer or stand mixer
-
Mixing bowls (various sizes)
-
Small saucepan
-
Rubber spatula
-
Measuring cups and spoons
-
Aluminum foil
Ingredients
For the Keto Chocolate Crust:
-
1 ½ cups almond flour
-
¼ cup unsweetened cocoa powder
-
⅓ cup granular erythritol sweetener (like Swerve)
-
½ tsp salt
-
6 tbsp unsalted butter, melted
-
1 tsp vanilla extract
For the Cheesecake Filling:
-
32 oz (four 8-oz blocks) full-fat cream cheese, softened to room temperature
-
1 ¼ cups granular erythritol sweetener (like Swerve)
-
¼ cup sour cream, room temperature
-
1 tsp vanilla extract
-
4 large eggs, room temperature
For the Keto Cherry Topping:
-
12 oz frozen or fresh pitted dark cherries
-
¼ cup powdered erythritol sweetener (like Swerve Confectioners)
-
2 tbsp water
-
1 tbsp lemon juice
-
1 tsp vanilla extract
-
2 tbsp Kirsch (cherry brandy) optional, but recommended for authenticity
-
1 tsp xanthan gum
For the Garnish:
-
½ cup heavy whipping cream
-
1 tbsp powdered erythritol sweetener
-
Sugar-free dark chocolate, for shaving
Instructions
Part 1: Make the Cherry Topping (Can be made a day ahead)
-
Combine: In a small saucepan, combine the cherries, powdered sweetener, water, and lemon juice.
-
Simmer: Bring to a simmer over medium heat, then reduce the heat to low. Let it cook for about 10-12 minutes, stirring occasionally, until the cherries have softened and released their juices.
-
Add Flavor: Stir in the vanilla extract and the Kirsch (if using).
-
Thicken: Sprinkle the xanthan gum evenly over the cherry mixture. Whisk vigorously for 1 minute to combine and prevent lumps. Continue to simmer for another 2-3 minutes until the sauce has thickened to a syrupy consistency.
-
Cool: Remove from heat and let it cool completely to room temperature, then transfer to the refrigerator to chill. The topping will continue to thicken as it cools.
Part 2: Make the Chocolate Crust
-
Preheat & Prep: Preheat your oven to 325°F (160°C). Cut a large circle of parchment paper and place it in the bottom of your springform pan, then clip the sides in place. This guarantees your crust won’t stick. Lightly grease the sides of the pan with butter.
-
Mix Dry Ingredients: In a medium bowl, whisk together the almond flour, cocoa powder, granular sweetener, and salt.
-
Add Wet Ingredients: Pour in the melted butter and vanilla extract. Stir with a fork until the mixture is well combined and looks like wet sand. It should hold together when pinched.
-
Press into Pan: Transfer the crust mixture into the prepared springform pan. Using your fingers or the flat bottom of a measuring cup, press the crumbs firmly and evenly into the bottom of the pan. Press about ½ inch up the sides to create a slight edge for the filling.
-
Bake: Bake the crust for 10-12 minutes. It will look slightly puffed and feel dry to the touch. Remove from the oven and set aside to cool slightly while you make the filling. Leave the oven on.
Part 3: Make the Cheesecake Filling
-
Beat Cream Cheese: In a large mixing bowl, beat the softened cream cheese with an electric mixer on medium speed until it is completely smooth and creamy, with no lumps. This is a crucial step for a silky cheesecake. Scrape down the sides and bottom of the bowl well.
-
Add Sweetener: Add the granular sweetener and beat until combined.
-
Add Sour Cream & Vanilla: Add the sour cream and vanilla extract, and mix on low speed until just incorporated. Scrape the bowl again.
-
Add Eggs (One at a Time): With the mixer on low speed, add the eggs one at a time, beating just until the yolk disappears after each addition. Do not overmix! Overmixing incorporates too much air, which can cause the cheesecake to puff up and crack. After the last egg is added, give the bowl one final gentle scrape and stir by hand with a spatula to ensure everything is perfectly combined.
-
Assemble: Pour the cheesecake filling over the slightly cooled crust. Use a spatula to smooth the top evenly.
Part 4: The Water Bath (For a Crack-Free Cheesecake)
-
Prepare Pan for Water Bath: Tear off a large sheet of heavy-duty aluminum foil. Place the springform pan in the center and tightly wrap the foil up the sides, covering the entire outside of the pan. This will prevent water from seeping in.
-
Create Water Bath: Place the wrapped springform pan into a larger roasting pan. Carefully pour the cheesecake filling into the pan. Place the roasting pan on the oven rack. Carefully pour hot (not boiling) water into the roasting pan until it reaches about halfway up the sides of the springform pan.
-
Bake: Bake for 50-60 minutes. The edges of the cheesecake will look set, but the center should still have a slight jiggle (about the size of a 3-inch circle). It will firm up as it cools.
-
Cool in Oven: Turn the oven off and crack the oven door open. Let the cheesecake cool in the oven for 1 hour. This gradual cooling helps prevent cracking.
-
Chill: After an hour, remove the cheesecake from the water bath and discard the foil. Run a thin knife around the edge of the pan to loosen the cheesecake (this also helps prevent cracking as it contracts). Let it cool completely on a wire rack, then cover and refrigerate for at least 6 hours, preferably overnight.
Part 5: Garnish and Serve
-
Whip the Cream: Just before serving, place a metal mixing bowl and beaters in the freezer for 10 minutes. Pour the heavy cream and powdered sweetener into the cold bowl and whip on high speed until stiff peaks form.
-
Assemble: Release the sides of the springform pan from the fully chilled cheesecake. Spread the cooled cherry topping over the top of the cheesecake, leaving a small border if desired.
-
Garnish: Pipe or dollop the whipped cream around the edge or on top of the cherries. Use a vegetable peeler to shave curls of sugar-free dark chocolate over the top for a beautiful finish.
-
Serve: Slice with a sharp, hot knife (dip in hot water and wipe clean between slices) for clean cuts.
Storage
Store any leftover cheesecake in an airtight container in the refrigerator for up to 5 days. This cheesecake also freezes beautifully! Wrap individual slices tightly in plastic wrap and then in foil. Freeze for up to 3 months. Thaw in the refrigerator overnight before serving.
Nutrition Information
*Please note that the following nutrition information is an estimate and will vary based on the specific brands of ingredients used. It is based on the recipe as written, using the optional Kirsch and standard sugar-free sweeteners. This calculation is for 1 slice of 12.*
| Nutrient | Amount Per Serving |
|---|---|
| Calories | 425 |
| Fat | 39g |
| Saturated Fat | 20g |
| Carbohydrates | 9g |
| Fiber | 3g |
| Sugar Alcohols | 18g |
| Net Carbs | 6g |
| Protein | 10g |
| Cholesterol | 135mg |
| Sodium | 310mg |
| Potassium | 210mg |