Prep Time: 45 minutes
Cook Time: 30 minutes
Intensity (1-5): 4 (Moderate) – This recipe involves roasting peppers, handling hot foods, and a light batter. It’s a rewarding weekend project!
Author: [Your Name/Website Name]
Servings: 4 (2 rellenos per serving)
Category: Dinner, Main Course, Vegetarian
Cuisine: Mexican, New Mexican
The Story Behind the Recipe
If you’ve never experienced the magic of a fresh Hatch chile, let this be your introduction. Grown in the Hatch Valley of New Mexico, these chiles have a devoted following, and for a few weeks at the end of summer, their arrival is celebrated like a holiday. Their smoky, slightly sweet, and undeniably earthy flavor is the star of this classic dish.
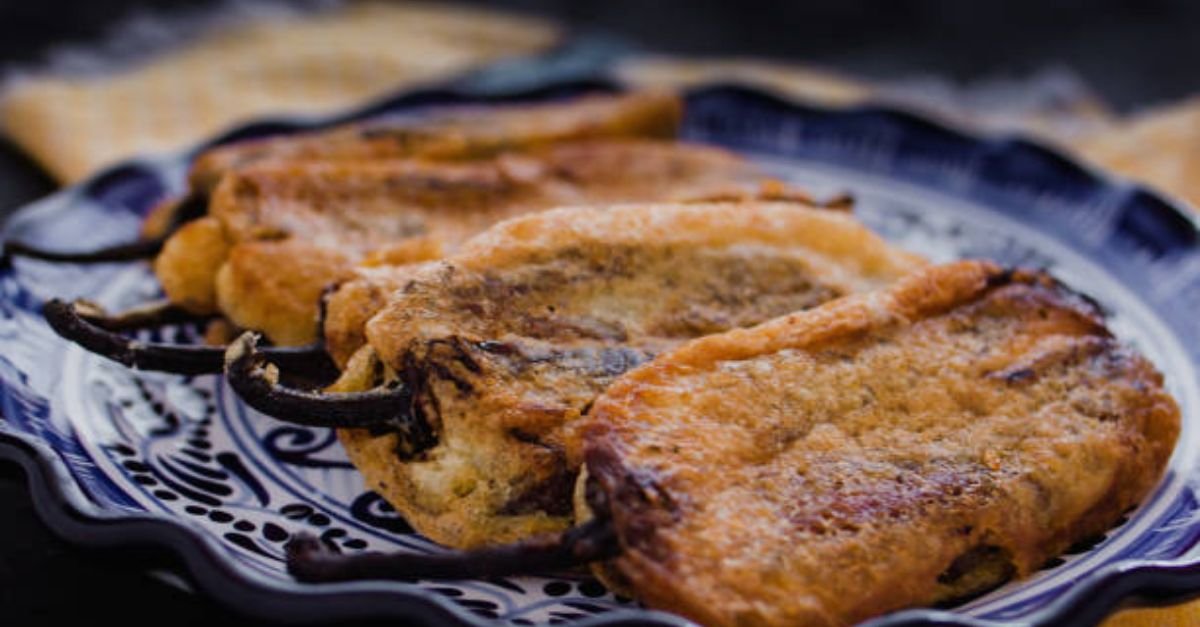
While traditional Chiles Rellenos are wonderful, this recipe is engineered for the ultimate texture experience. We’re ditching the sometimes-heavy, egg-white-only batter for a light, luscious, and unbelievably crispy coating. It’s a golden, craggly shell that shatters with each bite, giving way to a blanket of perfectly melted, stretchy cheese, all wrapped around the tender, roasted Hatch chile. Get ready for a crispy, cheesy delight that will transport your taste buds straight to the Southwest.
Ingredient Notes
The quality of your ingredients makes a difference here. Let’s break down what you’ll need.
-
Hatch Chiles (8 large): The heart of the dish. Look for Hatch Valley chiles. If you can’t find Hatch, you can substitute with Anaheim or Poblano peppers, though the flavor profile will be different. For heat, choose “hot” or “medium” Hatch chiles if you like a kick, or “mild” for a more family-friendly version. We use 8 to ensure everyone gets a hearty serving of two.
-
Cheese (8 oz block): Use a good melting cheese. Monterey Jack is the classic choice for its buttery flavor and incredible stretch. Asadero or Oaxaca cheese are also fantastic, traditional options. Crucially, buy a block and grate it yourself. Pre-shredded cheese is coated with starches and anti-caking agents that prevent it from melting smoothly.
-
Eggs (4 large): We’ll be separating the yolks and whites. This is the secret to the light, airy, and crispy batter.
-
All-Purpose Flour (1/2 cup): For dredging the chiles, which helps the batter adhere.
-
Vegetable or Canola Oil: You’ll need enough for frying, about 1-2 inches deep in your skillet. Use a neutral oil with a high smoke point.
-
For the (Optional) Simple Red Sauce:
-
2 tbsp vegetable oil
-
2 tbsp all-purpose flour
-
2 tbsp New Mexican red chile powder (not cayenne!)
-
2 cups vegetable or chicken broth
-
1 clove garlic, minced
-
Salt to taste
-
See recipe card below for a full list of ingredients with measurements.
Step-by-Step Instructions
This recipe flows in three parts: roasting the chiles, preparing the filling and batter, and the final fry.
Part 1: Roast the Hatch Chiles
This step is non-negotiable. Roasting transforms the chiles, softening their flesh and deepening their flavor with a subtle smokiness.
-
Roast: There are several ways to do this. The goal is to blister and blacken the skin all over.
-
Oven: Place chiles on a baking sheet lined with foil. Set your oven rack about 4 inches from the broiler and broil, turning frequently with tongs, until the skin is blackened and blistered on all sides, about 10-15 minutes.
-
Gas Stove: If you have a gas stove, you can place the chiles directly over the flame of a burner. Use tongs to turn them as the skin chars. This is the quickest and adds the most smoky flavor.
-
Grill: Place chiles on a hot grill, turning occasionally, until the skins are well-charred.
-
-
Steam: Immediately transfer the hot, charred chiles to a heatproof bowl and cover tightly with plastic wrap. Alternatively, place them in a paper bag and fold the top closed. Let them steam for at least 15 minutes. This loosens the skin, making it incredibly easy to remove.
-
Peel and Seed: Once cool enough to handle, the skin should slip right off. Use your fingers or a paper towel to gently rub away the charred skin. Do not rinse them under water, as this washes away the flavorful roasted oils. Once peeled, make a small, careful 2-inch slit lengthwise near the stem. Using a small spoon, gently scoop out the seeds and the membrane (the white ribs inside), being careful not to tear the chile further. Keep the stem on for a classic presentation. Set the peeled chiles aside on a paper towel to drain any excess moisture.
Part 2: Assemble and Prepare to Fry
-
Stuff the Chiles: Take your grated cheese and carefully stuff it into each chile through the slit you created. Don’t overstuff, or the cheese will burst out during frying. Gently press the chile closed—the cheese will help hold it together.
-
Prepare the Dredging Station: Spread the ½ cup of all-purpose flour on a large plate.
-
Make the Batter: In a large, clean bowl, beat the 4 egg whites with a pinch of salt using an electric mixer (or a whisk and some serious elbow grease) until stiff, glossy peaks form. The whites should be thick enough that they don’t slide around when you tilt the bowl. In a separate small bowl, whisk the 4 egg yolks until they are light and smooth. Gently fold the yolks into the stiff egg whites until just combined. Be careful not to deflate the mixture. The batter will be light and billowy.
Part 3: Fry to Golden Perfection
-
Heat the Oil: Pour about 1-1.5 inches of vegetable oil into a deep, heavy-bottomed skillet or Dutch oven (cast iron is perfect). Heat the oil over medium-high heat until it shimmers. To test if it’s ready, drop a tiny bit of batter into the oil. If it sizzles and floats to the surface immediately, it’s ready. You want the temperature around 350°F (175°C).
-
Dredge and Dip: One by one, take a stuffed chile and gently dredge it in the flour, shaking off any excess. Using a fork or your fingers, carefully dip the floured chile into the egg batter, coating it completely. Let any excess batter drip off for a second.
-
Fry: Carefully place the battered chile into the hot oil. Don’t overcrowd the pan; fry only 2-3 at a time, depending on the size of your skillet. Fry for 2-3 minutes per side, or until the batter is puffed, golden brown, and gorgeous. Use a slotted spoon or spatula to gently turn them.
-
Drain and Serve: Once golden brown, transfer the fried chiles rellenos to a wire rack set over a baking sheet (this keeps them crisper than paper towels). Sprinkle immediately with a tiny pinch of salt. Serve hot, plain or with a simple red or green chile sauce.
Serving Suggestions
-
Classic Style: Serve 2 rellenos on a plate, topped with a generous ladle of Red or Green Chile Sauce (see note below). A sprinkle of queso fresco and a side of Mexican rice and refried beans make it a complete feast.
-
Egg-cellent Breakfast: Place one relleno on a plate and top with two sunny-side-up eggs. The runny yolk mixing with the cheese is divine.
-
Simple & Fresh: Enjoy them as-is with a side of fresh pico de gallo, a dollop of sour cream or Mexican crema, and some sliced avocado for a lighter meal.
Quick Red Chile Sauce Note: While the rellenos rest, you can make a quick sauce. In the same skillet (carefully pour out the frying oil and wipe it clean), heat 2 tbsp of fresh oil. Whisk in 2 tbsp flour and cook for 1 minute. Add 2 tbsp New Mexican red chile powder and stir for 30 seconds. Slowly whisk in 2 cups of broth, add a minced garlic clove, and simmer until thickened, about 10 minutes. Season with salt.
Storage & Reheating
-
Storage: Chiles Rellenos are best enjoyed immediately. However, you can store leftovers in an airtight container in the refrigerator for up to 2 days.
-
Reheating: To revive the crispiness, reheat them in an oven or air fryer at 375°F (190°C) for 10-15 minutes, flipping halfway through. The microwave will make the coating soggy.
Nutrition Information
Please note: The following nutrition information is an estimate and is provided for informational purposes only. It does not include the optional red sauce. Actual values may vary based on the specific ingredients and quantities used.
| Nutrition Facts | Per Serving (2 rellenos) |
|---|---|
| Calories | 585 kcal |
| Total Fat | 42 g |
| Saturated Fat | 15 g |
| Trans Fat | 0 g |
| Cholesterol | 245 mg |
| Sodium | 680 mg |
| Total Carbohydrate | 22 g |
| Dietary Fiber | 3 g |
| Sugars | 4 g |
| Protein | 28 g |
| Calcium | 580 mg |
| Iron | 3 mg |
| Potassium | 450 mg |
We hope you enjoy creating (and devouring!) this Hatch Chile Rellenos recipe. It’s a labor of love, but that first perfectly crispy, cheesy bite makes every second worthwhile. Happy cooking